Music download from YouTube to Computer is not as complicated as you think.
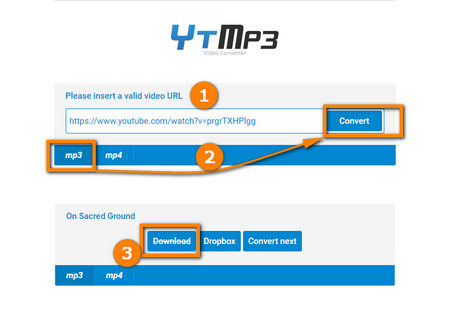
There are several ways for you to approach this. For starters, you can consider going for the many websites that offer conversion of YouTube videos like YTMp3 into different file formats like MP4, MP3, AVI and others.
However, there is always the potential of surfing through pop-up ads, malicious websites and forced sign-up requirements to get the music. This can be a pain!
That’s why we highly recommend everyone that wants to download music from YouTube to PC to follow the steps below:
Search for the music that you want to download on YouTube on your computer.
Click on the share button and copy the YouTube video link
Open a new tab on your browser
Search for YouTube to MP3 converter/download
Most of the top results are usually authentic websites
Use a converter to get the video file converted into audio format (MP3)
Download the converted file and save it to your computer.
How to Download Music from YouTube on Android
While you can always follow the tips we covered for downloading music from YouTube on a pc, it can be time-consuming.
Yes, that’s right. As the mobile interface is less complex than the desktop version, it takes time to convert and download music from YouTube android.
Dealing with pop-up ads can also be a nightmare on android and that’s why it’s important to use established conversion apps like Tubemate, Videoder, and Y2Mate.
You can also check out Google Play Store to get a list of all the YouTube to MP3 converters.
However, please note that some of the apps listed on the Play Store do require registration, and payment to access services like unlimited conversion, or access HD conversion.
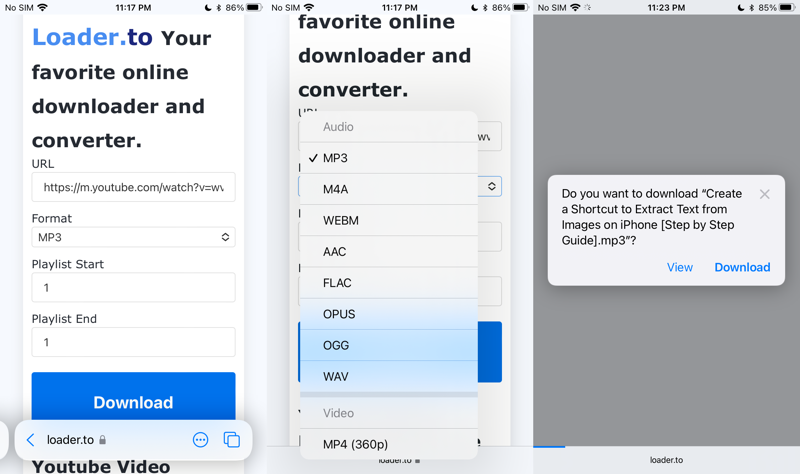
Here’s a step by step breakdown of how to download music to the phone from YouTube.
Open the YouTube app and search for the music you want.
Look for the Share button which is right next to the Like and Dislike buttons.
Click on Share and look for the ‘Copy Link’ option.
Copy the link and open a browser on your android phone.
Now open the converter app and paste the link on the app.
Select the quality, and file format (MP3 if you want music only).
Wait for the conversion to complete and download the file.
You can access the file from your downloads folder.
How to Download Music from YouTube to iPhone
Apple iPhone users can also consider going for online convertors to get their video converted into music.
However, a safer alternative would be to consider subscribing to YouTube Music Premium (formerly known as YouTube Red).
The premium version of YouTube Music does require you to pay for their services after the free trial. But, you can access music on YouTube seamlessly without ads.
You can also download music for offline listening on your iPhone with the YouTube Music app.
This prevents users from having to go through the pain of converting, downloading and transferring the music to their iPhone.
It also greatly reduces the risk of having your iPhone’s security compromised, knowingly or unknowingly. Follow this guide to know more about downloading music from YouTube to your iPhone.
Open the YouTube App on your iPhone.
Log in to your account
On the dashboard, click on “Get YouTube Premium”
Click on “Try it Free” to activate your trial subscription
You will see the download button under the music/video you want.
Choose between 144p, 360p, and 720p
Click ‘OK’ to initiate your download.
Few More Things to Remember
Make sure that you don’t download any apps, browser extensions or click anywhere on pop up ads that might open with the converter website.
It is illegal to distribute the audio you downloaded for profit. Only follow this method if you want to download music from YouTube video to computer for non-profit or personal use.
Check websites and forums like Reddit and Quora to get a list of authentic YouTube converters.
If you are going for YouTube premium, please note that you will be unable to access your downloads if the subscription expires or gets cancelled.
To Summarize
You are not shy of options when it comes to music download from YouTube to your phone or computer.
As a matter of fact, you are spoiled for choices.
That’s why you must weigh in on the many options and go for what you consider as the best option. I
f it’s the safest option that you seek, we highly recommend going for YouTube Premium or YouTube Music Premium.
If you are not interested in a subscription plan, go for websites and apps that convert YouTube videos for free.
Twitch is one of the fastest-growing streaming platforms in the world as of 2022.
The platform had an average concurrent viewership of 2.78 million viewers in 2021, which is an increase of more than 68% from 2020.
That’s why any discussion about streaming on social media networks is incomplete without the mention of Twitch.
To compete with the likes of Facebook, YouTube, and Mixer, yet come out on top as the largest streaming platform for video game streaming is no small feat.
As a result, more brands, influencers, and marketers are all now turning to Twitch!
The time’s just about right to start your streaming career on Twitch. That’s why we have you covered with the ultimate guide on how to stream on Twitch.
Continue reading to learn everything you need to master on Twitch streaming.
How to Prepare Your stream on Twitch?
Twitch is one of the best platforms to launch your video streaming career.
You just need to have a Twitch account ready, along with some streaming software and hardware that comes in handy when it comes to video streaming.
However, we highly recommend you spend some time, brainstorming name ideas that would work for you, as a creator.
Remember, your name as a creator will be the brand when you get established.
This is the name with which creators that follow you, recognize and relate to your content. That’s why it never helps to go with a random name and change it later.
Once, you have decided on a game, the next thing you need to do is create an account on Twitch.
How to Create an Account on Twitch?
Creating an account on Twitch is pretty straightforward.
If you have a name that’s good to go, it helps to spend some more time, designing or creating banners, and profile pictures for Twitch.
It is not mandatory to have a profile picture or banner on your Twitch profile, but it helps as it makes your Twitch account look very professional.
More on that later, but let’s take you through the steps required to create an account on Twitch!
There are two ways to create your Twitch account depending on whether you use a mobile or desktop. If you are using a mobile device, you will need to download the Twitch app from Google Play Store or Apple App Store.
Once that’s done, follow these steps:
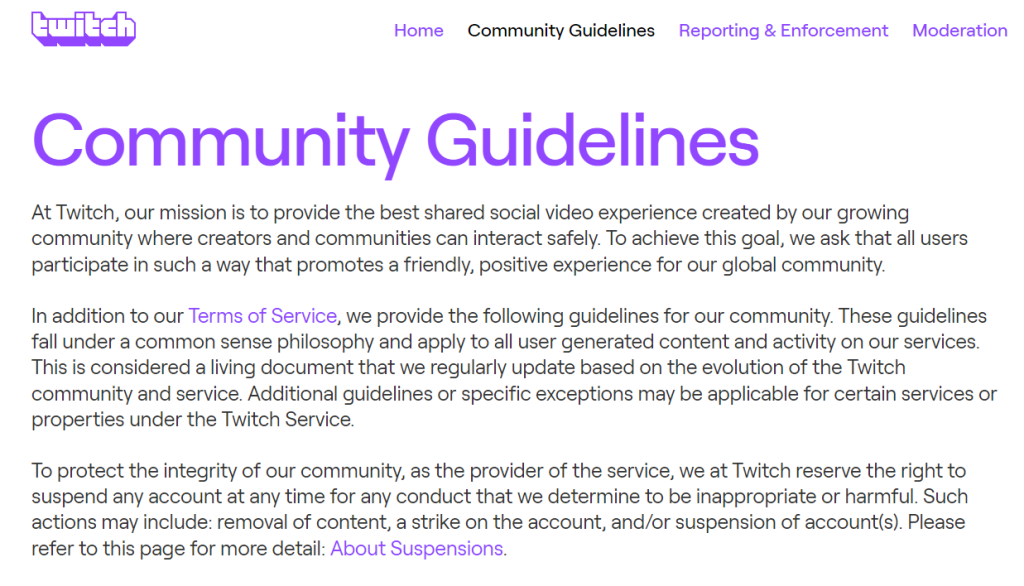
Step 1: Go Through the Twitch Community Guidelines
Image: Twitch
Twitch has a dedicated community guidelines page that lists out what is legally allowed on Twitch.
As a creator on the platform, you must make sure that you abide by these rules, and adhere to the policies mentioned in the Twitch community guidelines.
Failure to do so can result in your account getting temporary or permanent bans.
Even though there are a lot of rules, regulations, and compliances in the Twitch community guidelines, they can primarily be summarized in the following:
Content that is sexually explicit, hateful, discriminatory, and too graphic is prohibited.
Cheating, hacking, botting, or stream sniping in online multiplayer games are prohibited.
Broadcasting alpha/beta versions with prior approval from the published/developer is prohibited.
Content that exclusively focuses on extreme or gratuitous gore and violence is prohibited.
Spam, scam, and other malicious content are prohibited.
Nudity and sexually explicit content or activities, such as pornography, sexual acts or intercourse, and sexual services, are prohibited.
Step 2: Create a Twitch Account
Once you are done with Twitch Community Guidelines, you are all set to create a Twitch account.
If you are using Twitch from mobile, simply open the app, and click on the “Sign Up” option to start creating your account. Twitch mobile app usually asks you to create an account through phone number, and add email later.
For those who are on a desktop or laptop, open your browser and head over to twitch.tv and look for the “Sign Up” option.
Enter all the information as required to complete the sign-up proceedings.
Step 3: Enable Two-Factor Authentication
Social networking platforms are pretty serious about improving your account’s safety.
That’s why almost every leading social networking platform out there asks you to enable two-factor authentication (2FA) on your account.
When it comes to Twitch, you cannot start broadcasting on the platform without enabling 2FA!
Unfortunately, you can only enable 2FA on your account by using Twitch from a desktop or laptop. Log in to your account from a computer, find the security settings, and enable 2FA.
If you are having difficulties in finding the 2FA option, follow these steps:
Log in to your Twitch account.
Now click on your profile picture from the top right corner.
A drop-down will now appear, from which you need to click on “Security and Privacy”.
Scroll down until you come across “Two Factor Authentication”.
Tap the “Set Up Two-Factor Authentication”
Next, you need to click on “Enable 2FA” and follow the instructions.
You will unlock a few new emotes for enabling two-factor authentication on your account. 2FA also adds an extra layer of security which ensures that your account is not prone to hackers and phishing attempts.
Best softwares for Streaming on Twitch
When it comes to live-streaming on platforms like Twitch, it is important to have access to the right tools and software to get the absolute best result for your broadcasts.
Fortunately, there are plenty of dedicated streaming software encoders that come in-built with loads of features.
They are also very easy to set up and act as plug-and-play software which can be installed for free on most devices.
If you are new to streaming software or not sure about which software to go with, here is our collection of some of the best software for streaming on Twitch:
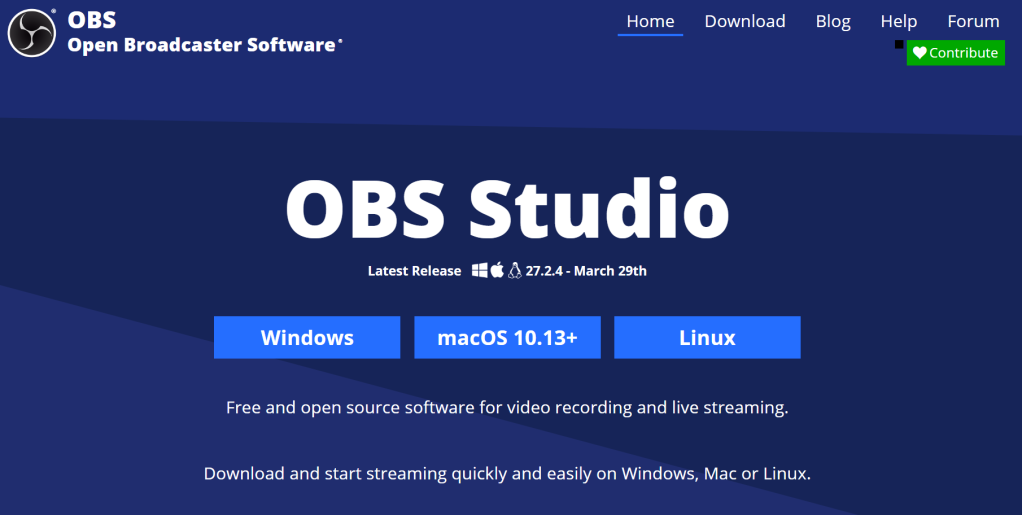
OBS Studio
OBS Studio
Open Broadcaster Software, popularly known as OBS Studio is one of the oldest and most popular streaming software out there today. OBS Studio offers real-time capture, scene composition, recording, encoding, and broadcasting through the Real-Time Messaging Protocol (RTMP). You can also stream videos to social media platforms like YouTube, Twitch, Instagram, and Facebook.
Streamlabs
Streamlabs
Streamlabs Desktop, formerly known as Streamlabs OBS is an upgraded version of OBS Studio which is perfect for creators that are new to streaming software. If you want more accessibility tools, viewer interaction options, chat management features, and tip donations, we highly recommend that you consider using Streamlabs. They also have chatbot and live subscriber notifications.
Lightstream Studio
Lightstream Studio
Lightstream Studio is perfect if you want a simple interface that allows you to stream to Twitch, Facebook, YouTube, and custom RTMP. One of the key features that make them stand out from the rest is their ability to capture Xbox and PlayStation gameplay without a capture card. The only downside to using Lightstream is that you need a subscription to use their features.
There are also other services like XSplit, vMix, OWN3D Pro, Wirecast, and many others.
What Hardware Do You Need to Start Streaming on Twitch?
When it comes to streaming on Twitch, you only need basic streaming equipment.
In short, you only need a good smartphone, gaming console, laptop, or computer, a video capture device, and an external audio capture device.
You can still shoot content with 4K quality, and 60 frames per second easily with such a basic setup, thanks to how optimized, Twitch as a platform is.
Let’s take a closer look at how different hardware work on Twitch:
Smartphone, Console, or Computer
Twitch is now becoming more and more optimized for smartphones.
The mobile app, which was introduced as an interface to watch streamers in action has evolved much further than what it was when it was introduced.
Today, you get an entire live streaming suite that lets you stream games from your smartphone.
Consoles have also come a long way from what it was in the past with the recent generation of all consoles offering up to 60FPS support on 4K resolution.
Desktops and laptops, on the other hand, continue to be the most preferred choice for streamers on Twitch, simply because of how smooth they are when compared to consoles, and smartphones.
There are also gamers that use computers for broadcasting what they play on consoles.
Ideally, you want to have a setup where you can game on your preferred hardware with support from streaming software, external microphones, and accessories like lighting softboxes.
One of the main advantages of going for desktops is that you can continuously upgrade aspects like graphics card, and processor to get better results.
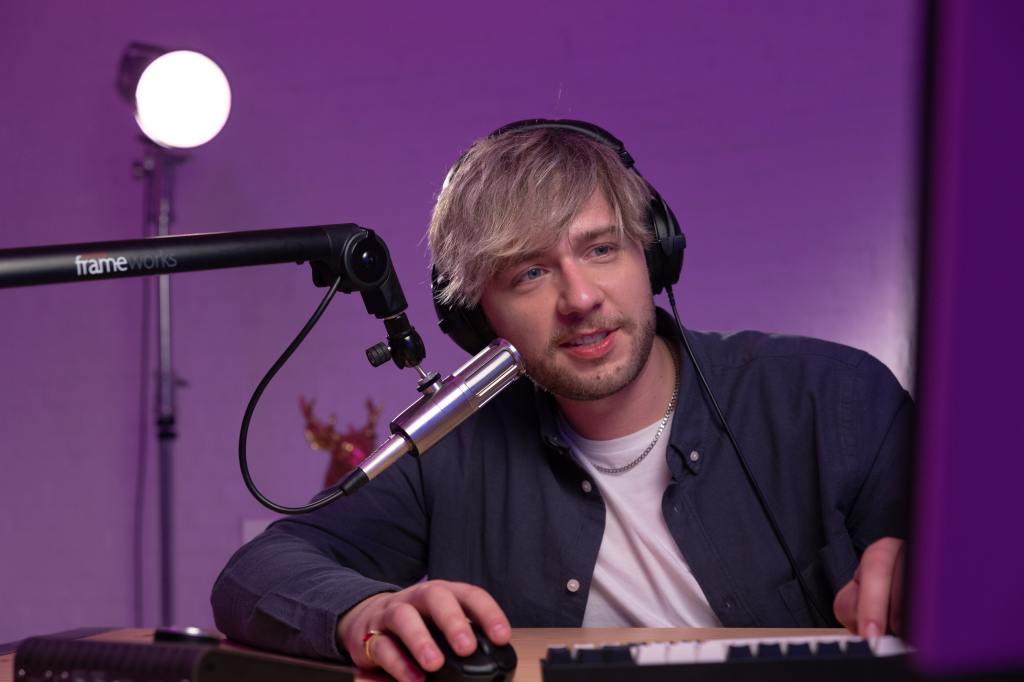
Microphone
Microphones are an essential component for any successful streaming career on Twitch.
Not only do they convey your ideas in a speech to your fans and followers, but they also reveal your personality as a creator on the platform.
Twitch is also a platform, where creators can also simply chat with followers.
That’s why investing in a solid microphone is a must-have for all streamers on Twitch. While the native microphone in most headsets does a good job at proving high-quality audio, it is always recommended to buy an external microphone for streaming.
You can also play around with some of the features on the audio setting of streaming platforms to get amazing results on your Twitch audio.
At the end of the day, it is always best to invest in high-quality microphones.
Camera
Having a decent camera can do wonders for your creator’s journey on Twitch.
However, it’s not mandatory to purchase an expensive camera, especially when you are just starting on your streaming journey.
You can also make do with the default webcam that you get with your computer or laptop.
But, if you want to improve your video quality, it is highly recommended to consider purchasing an affordable webcam to improve your overall video quality.
How to Start Live Streaming on Twitch from a Computer?
When it comes to streaming on Twitch, it’s always best to make use of your computer.
You don’t need to have access to a high-end performance computer to stream on Twitch.
However, it helps to have a good graphics card and processor that is capable of handling the games.
A good alternative strategy that many gamers use is to play with consoles and use the computer, as a secondary streaming tool that you can use as a host for your software encoder.
Now, that we have covered how to start live streaming on Twitch from a computer, let’s take a look at all the steps you need to follow:
Install a broadcasting software like Streamlabs, OBS Studio, or Twitch Studio
Log in to your Twitch account from the broadcasting software.
Most of the latest streaming software has direct integration which makes it easy to connect your Twitch account to the streaming software.
Once that’s done, you need to set up your streaming setup.
Ideally, it’s always best to have essential streaming widgets like an alert box, live chat, webcam frame, banners, and start, intermission, and end screen.
You will also need to add a video capture device, audio capture device, and add filters if required.
When you are all set, launch the game, and click the “Go Live” button to start streaming on Twitch.
Now that you are armed and equipped with all the information you need, you are all set to start your Twitch adventure. Hope you succeed with tens and thousands of followers and become a top creator on the platform!